AMA: How to organise the craft cupboard
This week’s AMA comes from a lovely young lady who works at an after-school programme in the Waikato. She has been given the responsibility of organising the craft supplies cupboard (OMG, dream job! Anyone else a stationery/craft fan??) and wasn’t quite sure where to start. Professional organiser to the rescue!
Looking at the first photo, the shelves on the left-hand-side look great. Whenever you are organising a space with lots of small pieces, containers are your secret weapon (see the Top Tip >>), so you’re on the right track there. I can see that the containers are mostly labelled, so you can quickly find what you’re looking for without needing to open them. Because the containers have lids you can really biff them around if you’re in a hurry to grab something, and they’ll still be easy to put back tidily when you’re finished with them.
TOP TIP! ONE VS. MANY
The reason containers are so critical for organising lots of small pieces is because of the One vs. Many Rule of Movement. It is easier to move one item (e.g. the container with 50 small items inside it) than it is to move the 50 small items individually.
The shelf straight ahead needs a bit of work to get it to the point where it is easy to use AND easy to keep tidy. You will have a good idea of what is in each of those containers, so hopefully my first recommendation doesn’t freak you out! I suggest you take everything off the shelves, and start grouping like-with-like (the goal is to create categories of your supplies). You mentioned you have a set amount of time each day to dedicate to your organising project, so you’ll need to be able to work in small bursts and put everything away relatively tidy at the end of each session. To keep it manageable:
Pull together a few large empty boxes – visit your local supermarket or vege shop and ask if they have any banana boxes that you can have. If the boxes have lids, even better – then you can just stack them up when you’ve finished each day.
Put the empty boxes on the floor and work shelf by shelf, creating categories as you go. For example, you could create a “Painting” category that has paints, paintbrushes, palettes, sponges and all other supplies used for painting. Another category could be “Fabric”, another category “Paper” and so on.
Don’t get too specific with your categories - this should be a quick sorting process so don’t waste too much of your time. If it makes more sense to have a box dedicated to “Art”, and you put painting, drawing, colouring supplies into that box, then go for it.
Take stuff out of containers as you go, and set the empty containers aside so you can repurpose them if possible.
Once your shelves are empty, it’s time to start putting things away again. Our goal is to reuse as many of the containers as possible so you don’t waste money, BUT there are some exceptions. The big red crate/basket is fantastic – it is really strong, has a handle so can act like a drawer to be pulled out from the shelf, and is perfect for storing bulky items. It looks like you could fit two of those per shelf; so if you had four crate/baskets in total, you could put them on the bottom two shelves. I recommend ditching cardboard boxes – they won’t stand up to lots of handling, they bulge out of shape and just generally start to look untidy pretty quickly (see Top Tip >>).
TOP TIP: MESSY ATTRACTS MESSY
As soon as something starts to look a little rundown and messy, it is will start to attract mess - this is because people subconsciously start to believe that no-one cares about that space, and therefore they stop caring. This is the reason I suggest cardboard boxes go straight to the recycling bin, especially in communal spaces.
The final piece of advice I have for that first photo is to label like crazy! You don’t need a label-maker - some masking tape and a vivid will do the trick nicely. Go to town and label, label, label till your little hand is falling off from all the writing (see the Top Tip >>).
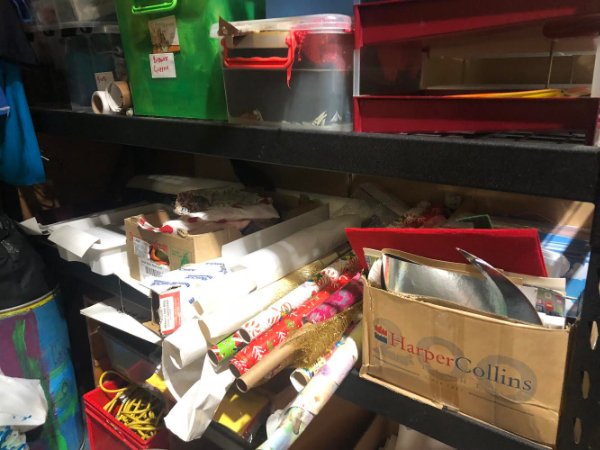
For the second photo, you can use a lot of the techniques shared above:
Ditch the cardboard boxes in favour of crates and containers that are strong and have lids (wherever possible).
Label like your life depends on it!
TOP TIP: LABEL EVERYTHING
Especially in communal spaces where multiple people can help you keep things tidy. We humans are obedient creatures - if it is quite obvious where something belongs, it becomes wilfully naughty for us to put it somewhere else. Adding a label is like adding a simple instruction that is easy for your colleagues to follow.
My final piece of advice is about the wrapping paper. Lying them flat on the shelf like that is asking for them to be squished, torn and ruined. I recommend standing those up vertically, and putting in a container (ideally one of those red plastic crates if you have any left) beside the shelf if there is room. By standing them vertically in their own container, you’re giving them their own home that does not look inviting to stash other bits and pieces - so they’ll stay in good shape for longer.
And that’s it for my first AMA! Thank you for submitting your question - I hope this helped you and would love to hear how you got on.
If you’re reading this and have a burning question for a professional organiser, you can find out more about submitting an AMA.
(Cover photo by Jo Szczepanska on Unsplash)


